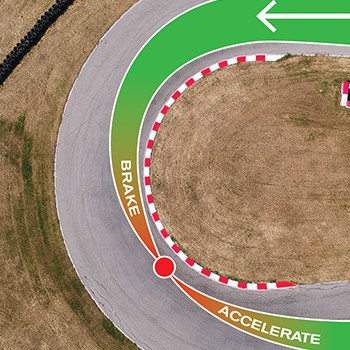
Trail braking is a high-performance driving technique that works on just about any course.1 It’s especially effective for front- or all-wheel drive vehicles, which can leave traction on the table if driven like a rear-wheel drive car. From the outside, trail braking looks like a driver hitting the brakes hard before diving in to a corner, and then quickly pointing the nose toward the exit and applying full power. In other words, a sweet braking-initiated drift. Do it right, and it’s fast.
There are three basic steps to trail braking. “We teach it [as] brake hard, turn in, then trail off to fix,” says Andrew Caddell, a driving instructor for DirtFish Rally School in Snoqualmie, Washington. “You’re coming in to a corner with a lot of speed,” he explains. “You’ve got to get that speed taken off to still be able to make the corner.”
Staying on the brakes as the car enters the corner means more of the car’s weight is transferred onto the front tires. This adds more front-end grip and helps the car turn in to the corner.
At the same time, keeping that weight off the rear tires gives them less grip, which helps the rear end of the car rotate. When done correctly, this technique helps the driver point the car where it needs to go and avoid understeer, or pushing to the outside of a corner.
Trail braking isn’t for every corner, though. Once you get the mechanics of the technique down, you’ll know better where to apply it.
Caddell clarifies: “The place you’d use this the most is if you have a long straightaway and it’s a medium-radius corner, you’re going to trail brake in. Or a sharp radius. If it’s a fast corner, you’re probably just going to give it a little bit of brake in a straight line and then get back on the power.”
It takes some practice and some space to learn how to do it. A rally school, such as DirtFish, will teach you a technique like this until you’ve got it nailed.
“If you’re on a road course, you get out to a track day or something, just keep working on different techniques and what feels best to you,” Caddell says. You can accomplish the technique either using your right foot on the brake [as described in “Heel-Toe Downshifting Demystified ”], but you can just as effectively do it with your left foot on the brake.
“I was a heel-toe guy, but I also left-foot braked at times,” says Caddell. “The more seat time you get in your car, the more it’s going to work out for you.”

Knowing your car is key. How much braking you can apply and how the vehicle behaves under those conditions take time to learn.
“Whenever you’re learning a new technique,” Caddell says, “start easier and earlier and then start building to it. It’s always best to start off a little lighter and then kind of build to get the speed going.” Setup also matters. Changing tires and brake pads can make a huge difference.
Know your conditions too. “In rally, you’re probably going to slide the car around a little bit more,” Caddell says. “In off-road racing, you’re going to do it as well. But in a road course, you want to get that car slowed down – you turn in, you keep the traction on the tires and then you’re able to accelerate out of the corner a lot faster.”
If you need a refrain to mutter to yourself while practicing, try this: Brake late. Brake hard. Turn in. Adjust pressure. Go!
1 Racing vehicles shown are driven by professionals on closed courses. Do not attempt. All Subaru vehicles sold by Subaru of America are designed and built for normal driving conditions. The Subaru Limited Warranty, as well as the Subaru Added Security® program, may exclude damage or failure resulting from modifications or participation in competition or racing events. See the Subaru Warranty and Maintenance booklet for further details.